| |
Tomb of Yearon
Adventure Summary
This adventure begins when the adventurers learn the legend of or stumble across
the Tomb of Yearon. The Tomb is located several days journey into a vast
swamp (in Sulerin, this is the Great Dhaal Swamp), but it could be placed at
any reasonably remote location.
Once the players have arrived at the Tomb, their
goal is simple and classic: penetrate the Tomb's guardians and pillage the
riches guarded within.
Adventure Background
"In the days when the Ivory Kingdom of Dhaal rose high above other nations.
A great gift was bestowed to King Termerion from the gods, a book of great
knowledge. This book held the three keys of supremacy within their pages,
which when used properly would unlock vast knowledge and power, previously
only known to the gods. To keep this relic safe it was separated into
three parts which became like stone, so that upon their assembling the book
would become whole and could be opened.
When evil came and seduced King Termerion he
was not unsteady in his devotion to the light and he sent it away. After his death,
once mortals had forgotten the value of the book should it be assembled,
evil came again. It spoke to the son of King Yearon and he succumbed to
the seductive whispers of power. He stole the relic from the study of his
father and disappeared into the wilderness to the north of the Great Dhaal
Kingdom.
The parts of the book were brought together
and a well of evil spoke from the hells and into the world, consuming the
child and the land about. Discovering the treachery, King Yearon assembled
his armies and left for the northern steps of his lands to find destruction
and demons waiting in every shadow that passed across the ruined earth.
With a mighty push and the work of his
greatest magicks he did battle with the evil that had snatched the book
from his dead sons fingers. But his heart was too weak and the evil was
strong.
Though tired, King Yearon was a cunning man and
he prowled into the depths of the heart of evil. There, with his magic
he was able to steal away the book. Before he could escape he was surrounded
by demons and a great bolt of lightning leapt from the sky and struck him
down, shattering the book and scattering its parts far across the lands.
Feeble and torn, Yearon fled from the plague
of the land and made haste south to garrison his cities against the
oncoming evils.
Before he had traveled long though he found
a scorched but whole stone piece of the book. This he secreted with him
back to the depths of his palace. The gods, furious at the mistreatment
of their gift to the mortals, smote the land with a great tide of water. The
tide fell upon the kingdom, destroyed much of its people, and also destroyed
the evil hordes gathering to the north.
King Yearon died only a few years after the
catastrophe, broken hearted at the loss of his Kingdom. Upon his death,
he was placed in a magnificent tomb, which he had built for himself.
Powerful guardians were erected there to keep his slumber from being
violated.
Unbeknownst to any but his most trusted, the
stone fragment of the book was placed within a secret chamber deep in the
tomb, where his spirit would guard it. Hidden from evil's sight, the fragment
has rested there ever since."
Traveling to the Tomb
| Roll d% | Random Encounter | EL |
| 01-10 | Nine Headed Cryo-Hydra (1) | 10 |
| 11-30 | Belker (1) | 6 |
| 31-40 | Ghasts (6) | 8 |
| 41-50 | Large Gibbering Mouther (1) | 7 |
| 61-70 | Day: Troll hunting party (3)
Night: Will-O'-Wisp (2) | 8
8 |
| 71-80 | Roper (1) | 10 |
| 81-00 | Shambling Mound (1) | 7 |
|
The area around the Tomb of Yearon is a dangerous place. Deep and sluggish
channels of water, deep mud, quicksand, thick swampy brush, and ancient
marsh trees grow all about. A predator could lurk just beneath the muck, up
in a tree, or may simply wander from one small island of dirt to the next.
Even during the day the lighting is wan as it passes through the tree canopy of
vegetation above and the air is thinly misted throughout the swamps.
Once per hour, when the party is moving around
above ground and not already in the tomb, there is a 20% chance they might
have a random encounter, rolled on the table below. If the party has stopped
to rest somewhere, roll for random encounters once every 4 hours.
Random Encounters
Nine Headed Cryo-Hydra (1): hp:94; Monster Manual, page 122.
This enormous beast has
laired not far from the tomb itself. If the party is more than a day away from the tomb or they
previously defeated the hydra then treat this as a "no encounter" result. The hydra approaches to
its breath weapon range, unleashes it, and then charges in.
Belker (1): hp: 38; Monster Manual, page 26.
The Belker
attempts to approach the party from behind, using its smoke form to blend in with the swamp mists, and
pick off one of their members while the others are unaware using its smoke claws. If it is able to finish
off one party member it retreats and perhaps attacks again at a later time.
Ghasts (6): hp: 34, 32, 26, 26, 22, 20; Monster Manual, page 97.
The ghasts rest buried beneath the earth during the day and wander about at night. If used as a
day encounter, the ghasts pull themselves from the earth in the midst of the party (move-equivalent
action) and attack. If at night they try to overwhelm any sentry before attacking the rest of the party.
Large Gibbering Mouther (1): hp: 52; Monster Manual, page 104.
Advanced creature AC: 18; Attacks: 6 bites +5 melee; Damage: bite 5; Face/Reach: 5 ft. by 5 ft./10 ft.;
The gibbering mouther rests in a shallow pool of swamp water. As the party approaches within range it
rises up and begins to gibber and attack. This particular gibbering mouther has lived quite well off of
weaker marsh inhabitants and is bigger and tougher than usual. If the gibbering mouther has been
previously encountered and slain then treat this as a "no encounter" result.
Troll hunting party (3): hp: 71, 63, 55; Monster Manual, page 180.
During the day, the trolls simply charge into battle. At night, one attacks from in front, and then once
engaged the other two charge in from behind.
Will-O'Wisp (2): hp: 30, 30; Monster Manual, page 184.
The wisps attempt to lead the party into the lair of the Gibbering Mouther before attacking (quite
perilous if the adventurers fall for it) by imitating two faint flickering torches distant in the swamp mists
and using its vocal apparatus to create faint sounds of conversation. If the adventurers don't fall
for the trick then they move among the party invisibly before suddenly appearing and attacking.
Roper (1): hp: 85; Monster Manual, page 156.
Although most ropers dwell underground, this one lairs in a nearby half-submerged cave, wandering out
occasionally to pose as a dead tree stump when it hunts. The roper attacks as soon as one or two party
members are within 40 feet. If the roper has been previously encountered and slain then treat this as a
"no encounter" result.
Shambling Mound (1): hp: 90; Monster Manual, page 162.
This large mound of dirt attacks after the party has passed by it.
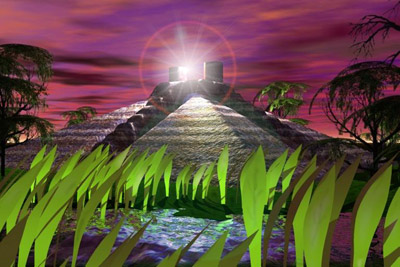
The Tomb
 The tomb rests in the middle of the southern Dhaal Swamps of the Hanois
Peninsula. From the outside it appears in a small jungle clearing, and is
in the shape of a Mezzo-American pyramid. The tomb is about 60 by 60 feet
wide at its base on the outside, and is approximately 30 feet tall. Atop of
the pyramid there are two small, squat pillars, between which radiates a flat
white light that illuminates much of the clearing. No creature of evil can
come within 50 feet of the temple. There are steps leading up all sides of
the building. Halfway up its eastern side, facing the rising sun, is a
rectangular entrance in the side of the building. No light penetrates
the blackness of the tomb's opening.
The tomb rests in the middle of the southern Dhaal Swamps of the Hanois
Peninsula. From the outside it appears in a small jungle clearing, and is
in the shape of a Mezzo-American pyramid. The tomb is about 60 by 60 feet
wide at its base on the outside, and is approximately 30 feet tall. Atop of
the pyramid there are two small, squat pillars, between which radiates a flat
white light that illuminates much of the clearing. No creature of evil can
come within 50 feet of the temple. There are steps leading up all sides of
the building. Halfway up its eastern side, facing the rising sun, is a
rectangular entrance in the side of the building. No light penetrates
the blackness of the tomb's opening.
Upon entering the temple, adventurers discover that no
light will be necessary while they travel within it as there is a soft brown
light which illuminates the inside of the tomb. Stone steps descend from the
entrance down into the earth beneath the tomb. They are only slightly dusted.
All of the walls of the tomb are covered in beautiful script of Iorian.
Characters who can read this ancient script will be able to read of the
history and downfall of the Ivory Kingdom, including the above, except
for the bit about where the piece telling of where the piece of the book
is placed. This story is simply repeated over and over throughout the
tombs walls.
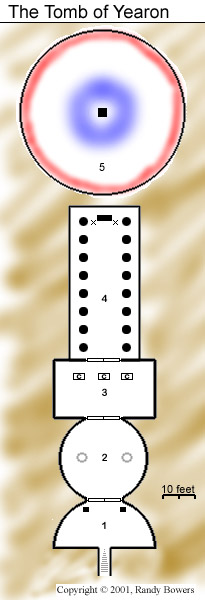
T1. Narthex
| A great half-moon shaped room opens
up at the bottom of the stairs before you. Its walls are covered in the same
ancient script which you found along the walls of the stairs behind you
leading back up. The wall across from you is rounded and interrupted by
double doors of bronze which stand fifteen feet tall in the center of it.
The doors are arched and come to a tip at their top, but are flat and
featureless except for a keyhole in their center. The floor of the room
is unadorned, cut from some single great slab of stone, and sanded smooth.
To either side of the bronze doors is a statue of a three headed snake
perched atop a short, square pedestal of brown rock. The snakes are like
great hooded cobras, their mouths closed and a twinkle of gems comes from
their eyes. Each stands about 5 feet tall, is carved of the same brown rock,
and covered with a fine layer of dust.
|
Up in the ceiling there are two holes which are just big enough to stick
one's arm into (Spot DC 10). Anyone noticing them and reaching into them
will find nothing. The locks on the doors may be picked (Open Lock DC 30),
but the mechanism is heavy and difficult for small lock picks to manipulate.
Since the adventurers will undoubtedly not know the correct command to get the
three-headed snakes off of the pillars, they will have to resort to other
methods.
Twisting the lock mechanism to the left or right
will both the three-headed snakes to animate, the dirt covering their bodies
flakes away, leaving the deadly brown-scaled serpent free to attack the
intruders of the tomb. Each snake has 70 hit points. After losing 40 hit
points, one of its heads will morph into its body. After losing a total
of 60 hit points the second head will morph into its body leaving one
remaining. Once the snake has lost all of its hit points its last head
morphs into its body and the construct crumbles into a pile of dirt. Attacks
upon the snakes before they are animated have no effect.
Three-Headed Snakes (2): EL 8; CR 6 each; Large Construct; HD 12;
hp 70; Init +5 (Dex); Spd 30 ft.; AC 24 (-1 size, +10 natural, +5 dex); Atk 3 bites +14 melee (1d6+6,
poison) or spit +11 ranged (40 ft., 0, poison); SA poison; SQ fast healing 3; AL N; SV Fort +4, Ref +4, Will +4;
Str 22, Dex 20, Con -, Int -, Wis 10, Chr 1;
Poison (Ex): Bite or spit,
Fortitude save (DC 16); initial and secondary damage 1d6 temporary Constitution.
|
Once the snakes are defeated the adventurers will discover
that there are gold marks (a coin roughly twice the size of a silver dollar.
value: 100 coins of metal type.) embedded in the tops of the stone pedestals.
Engraved into the coins are single-headed snake emblems. Anything that comes
within 3 inches of one of the gold marks will suddenly be bitten by a golden
snake (+5 melee, 1d4 damage) which forms out of the gold of the mark.
Immediately after the death of the second snake
two chains will fall from the two holes in the ceiling. These chains can
reach anywhere in the room, and the tips of them need to be brought near
the gold marks so that the snakes which animate there will grab onto the
chain. When this has happened the chains will be pulled into the blocks
of stone by the gold mark snakes and the double door into the next chamber
will open moving away from the characters and into the area T2.
Should the adventurers attempt to move the
stone pedestals upon which the snakes rested they will find that they
can be lifted up from hidden hinges by a combined strength total of at
least 18 since the blocks are very heavy. Beneath either block rests a
sturdy metal key. These keys are identical to each other and also to the
, key hidden in area T3. Since all of the locks are made for the
same key characters will find that either of these keys can be used to
turn the locking mechanisms for the various doors of the temple, including
the door from area T1 to area T2.
T2. The Wheel of Swords
| Beyond the bronze doors you are greeted
with a view into the next chamber of the tomb. Through the now open doors you
can see into a cylindrical room with a tall and darkly shadowed ceiling. Like
before, the lower half of this room is illuminated with the same strange brown
light which casts no shadows and the walls are covered with the same flowing
script. Across from your entrance into the chamber there is another set of
bronze doors, featureless like the ones before, except for the keyhole in
their center. Looking up, deep in the shadows that cloak the ceiling, you can
see a pinwheel of eight giant swords floating in the air, blades laying
horizontally and pointed out from the center. The blades hover forty feet
or so above your head, unmoving. Peering past them into the darkness above
you can barely discern two large metal cylinders which are perhaps half a
foot across at their base, but you cannot tell how long they are, nor how
far they extend up into the dark recesses of the room.
|
Characters searching the room may find (search DC 25) that there are pins on
the hinges of the doors to area T1 which can be
turned, allowing the doors to swing backwards and into area T1. As the doors
are moved into area T1 a metallic clicking sound to issues from above the
pinwheel of blades. Looking up, the adventurers may notice (spot DC 15) that as they pull
the doors from area T1 to area T2 that the metal cylinders above the
blades retreat further up into the darkness. Pulling the doors all the way open
will result in the cylinders disappearing into the darkness and then suddenly
|
Trap (CR 8): If characters proceed to pick the lock
or turn a key in the door to area T3 without first lowering the metal cylinders
than a trap is set in motion. The blades overhead begin spinning around and descend.
The door to area T1 locks. The blades quickly move downward at a rate of five
feet per round for the first four rounds. After four rounds, if the door lock mechanism
to area T3 is not turned back to its center position, the blades will suddenly
and alarmingly speed up, covering the remaining distance to the floor in two rounds,
killing any who are in the room. Attempts to turn the key back to the center position
after the first four rounds automatically fail, dooming the occupants of the room to a
quick death unless the characters can figure out how to get out or avoid the blades.
|
falling from above, through the pinwheel of blades, and down against the floor
of the chamber with the sound of a loud brass gong being rung. Each of the 16 ft.
tall cylinders remain upright where they fell, unwavering. There is a 1 in 10
chance for each person in the room that they were standing underneath the cylinders
when they fell, unless the player stated that they avoid standing beneath them.
Anyone beneath the cylinder when it falls should make a reflex save (DC 18) with
or be struck by one of the cylinders, suffering 8d6 points of crushing damage.
Having dropped the metal cylinders from above the players
can now turn the locking mechanism of the door from area T2 to area T3,
even with the door to area T1 open. The blades will spin down and when they
reach the level of the cylinders, there is a loud grinding sound as the room
shudders and is slowly spun clockwise several times. There is a loud metal click
and the door to the next room opens into area T3.
Closing the doors to area T1 will cause doors
to area T3 to close, the room to rotate counterclockwise, the blades to
retreat upward, and the cylinders to levitate back up into the darkness above the
pinwheel of blades, effectively resetting the room to its original state.
Picking the lock on the door to area T3 is just
as difficult as the previous door (open lock DC 30). The lock in the door will not
turn at all (impossible to pick) unless the doors to area T1 are closed or
are opened into the T1 chamber. In fact, attempting to pick the lock in the
door to area T3 sets in motion the trap unless the above procedure of
bringing the doors from area T1 into area T2 were followed.
If the locking mechanism in the door to area T3
is turned back to its center starting position before the beginning of the fifth
round in which the spinning blades descend than the blades immediately halt their
progress and begin to retreat back to their height of 40 feet and the door to
area T1 unlocks.
T3. Treasure Chest Puzzle
| You have reached the third chamber guarding
the tomb. From the doorway you can see it is rectangular in shape, about 30 feet
across and 20 feet deep. The same soft brown light fills this room and the walls
here are covered with the same script as those before. Across from you, on the
opposite side of the room, is another set of tall, arched bronze doors with a
keyhole in their center. The only other ornamentation to this room are three
chests. The chests are made of gold and stand about a foot high, wide, and deep.
They rest equally spaced from each other, just in front of the closed doors
across from you. Each chest appears identical to the others. None of them have
locks, and the lids are tightly closed.
|
Observant (spot DC 20) adventurers will note that one portion of the script which
adorns the wall above the closed doors to area T4 is different from the
rest of the text that decorates the other parts of the tomb. Characters who can
successfully read the Ivorian lettering can discern its message: "Cleansed by
death, the serpent is the path." This text refers to the golden key which
can be found by intentionally setting off the trap and surviving it.
|
Trap CR 8: If a chest is opened before they are arranged upon the ground
in the correct position then a horde of insects will spill forth from all of the
chests, filling the entire tomb in seconds, affecting the area as if three
creeping doom spells had been cast
by a 15th level spell-caster. Characters may make a reflex save (DC 20) or
they are overcome by the insects without recourse. Characters who successfully
save react fast enough to make one partial action before they are eaten.
The insects easily fill the entire chamber in one round, spilling out into area
T2 and proceeding to ravage all living things within the tomb. Unless
instant action is taken, characters will likely meet a quick and gruesome death
as they are quickly eaten alive.
|
The door to area T4 has something blocking
it for the locking mechanism will not turn in either direction and cannot be
picked without first solving the puzzle. Examining the chests will reveal no
traps beneath or around them (have the player's roll search checks anyway).
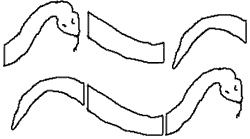
If the adventurers look upon the bottom side of the chests they will see three
different pictures, each being part of some serpent. Rather then simply telling
the players that it is a serpent, show or draw them a depiction of what is upon
the bottom of each chest. The chests are not positioned to make the snake
complete when the adventurers first look at them, rather they are mixed up.
Opening of the chests without first placing them in the correct order has
disastrous results and sets off the trap. Setting the chests in the
proper order will allow the adventurers to successfully open the doors to area
T4 with any of the keys they have obtained thus far.
The chests are made from steel and plated with gold on
all sides. They do not possess their trapped properties for the duration of any
time they are kept outside of the tomb, should the players remove them. Each chest
is worth 200gp.
Any character which survives the trap and who
looks in the chests will find that one of them contains a golden key that is
otherwise identical to the keys which they already have found. While any key
will open the doors to area T4 once the chests are arranged in the proper
order, only the golden key will grant access to area T5.
To get to area T5, the adventurers must first
recover the gold key by setting off the trap and surviving it. Then
assembling the chests in the proper order, the character holding the key
may find (search DC 20) a keyhole in the floor of the middle chest. This keyhole
is invisible to any but the possessor of the golden key. Inserting the golden key
into this keyhole and turning it causes the concurrent chest walls to disappear and
the bottom of the chest to magically change into a stairway descending down to
area T5.
T4. The Burial Chamber
| The floor beyond the open doorway is painted
a dazzling gold and a rainbow of light pours from some source up above. Looking up to
determine the source is difficult since the light is so bright that it hurts to squint
at its origins, but why look up when before you is a room of wealth. Like a majestic
hallway, the room extends away from you. Great white columns of smooth marble ascend
from the floor up into the brightly light ceiling of the room. Long tapestries with
woven creatures artistically emblazoned upon them adorn the walls between the columns
when extend out before you. As you enter the room your footsteps echo against the
golden floor. Ahead, at the end of the hall, some sixty feet away, is a raised dias
with a large white sarcophagus sitting atop of it. Around the dias are various
chests, some resting open and filled with wealth. Various fine arms, armors, vases,
heavy carpets, urns, and two unlit braziers also lay near at hand to the dias. Who
knows what finery is contained within!
|
Trap (EL 7)
Using fire to remove the yellow mold causes the brown
mold to hungrily eat up the heat source it can do any damage and causes it
to grow as described below.
Brown Mold CR 4: Brown mold feeds by absorbing heat;
where brown mold grows, the temperature is below average. Direct
sunlight, a daylight spell, or ultraviolet light kills it
instantly. If a non-cold subtype creature comes within five
feet of a brown mold, the mold drains heat equal to 4d8 points of cold
damage from its victim per round. A ring of warmth provides
complete protection against this attack. Brown mold grows instantly from
heat. If a torch is used in its vicinity, it doubles in size; if flaming
oil is used, it quadruples, and fireball-type spells cause it to grow
eight-fold. Brown mold is immune to all magic except disintegrate,
daylight, plant affecting magic, and cold spells. Spells with the
cold subtype cause brown mold to go dormant for 5d6 minutes.
Yellow Mold CR 4: This mold is pale yellow to golden orange
in color. If touched roughly, it may (50% chance) emit a cloud of spores in
a ten-foot radius. Any creature caught in this cloud must roll a successful
Fortitude save (DC 18) or begin choking. Use the rules for suffocation in the
DMG, page 88. A cure disease spell ends the choking effect. Fire of any
sort destroys yellow mold. Typically, a light spell renders it dormant
for 2d6 minutes, however the yellow mold in the Tomb of Yearon is not affected
by light spells.
Trap (EL 10)
When the sarcophagus is opened the room is
affected by a deeper darkness spell, the weapons around the room
animate and attack, and a skeletal warrior climbs from the sarcophagus
and attacks. Blinded adventurers suffer a 50% mischance to attacks, lose
their dexterity bonus to AC, and opponents gain a +2 attack bonus against them.
See DMG, page 83, for details.
Animated weapons (10) (EL 9): CR 2 each; Small construct; HD 4; hp 18;
Init +7 (Dex); Spd 30 ft.; AC 18 (+1 size, +7 Dex); Atk 1 slash +8 (+10 vs blind
opponents) for 1d6+3 damage; SQ damage resistance 10/-; AL N; SV Fort +1, Ref +1,
Will +1; Str 16, Dex 24, Con -, Int -, Wis 10, Chr 1
Skeleton (1) CR 6; Medium-size Undead; HD 6; hp 39; Init +7 (+3 Dex,
improved initiative); Spd 30 ft.; AC 20 (+1 Dex, +8 full-plate, +1 buckler
shield); Atk masterworked greatsword +12/+7 melee (+14/+9 versus blind opponents)
for 2d6+6, crit 19-20/x2 damage; AL N; SV Fort +2, Ref +5, Will +7; Str 18, Dex 16,
Con -, Int 3, Wis 14, Chr 11; SQ Undead; Feats: improved initiative, weapon
focus (greatsword), weapon specialization (greatsword)
|
Though the room is elegant in its decorum, it is also filled with several
lethal traps. Within the braziers is a brown substance which appears to be
incense, however it is actually brown mold. Any who come within 5 feet of
the braziers or near the sarcophagus will suffer 4d8 points of damage per
round (no save) due to the brown mold. Attempting to light fire to the
braziers will have even worse affect (see below the description of brown
mold). The chests of gold are also trapped, however with yellow mold,
which easily blends in with the gold which fills the chests. Any character
who examines (search DC 25) the chests may notice the presence of the
yellow mold. Merely disturbing the gold in the chests will release the
deadly affects of the yellow mold.
Both of the traps above are terrible indeed,
but the worse trap awaits the characters who are foolish enough to open
up the sarcophagus itself. The lid is heavy stone and can only be moved
aside with a combined strength of 40. Should the adventurers do so, read them
the following description.
| As the heavy lid is moved aside
the room becomes dark and you are disoriented by the sudden lack of light,
and a fear chills you as all around you hear the movement of steel sliding
and motion through the air! A deep rasping breathing becomes also audible
from where you remember the sarcophagus was and you hear the loud scraping
sound of the heavy lid that took several of you to move slide aside and
fall thunderously to the floor.
|
The room is plunged into a deeper darkness magical effect, the
weapons and bits of armor rise from the floor to attack, and the lid of
the sarcophagus is tossed to the floor by a powerful skeletal warrior as
it leaps out and joins the fray. The skeleton and the animated weapons
are not affected by the darkness.
The room remains dark after the fight, however,
10 minutes after the darkness began it will be possible for natural or
magical light to affect the area as the magical darkness has faded,
leaving natural darkness. Some adventurers may notice this (spot DC 35).
If the skeleton and weapons won the fight then they will rearrange the
tomb as it was before. The magic of the tomb will animate the fallen
adventurers gear with the spirits of the recently slain, leaving
everything prepared for new foolhardy adventurers to discover.
Assuming the adventurers won the combat, they
will discover that the sarcophagus is empty. The real body of King Yearon
lies underneath the sarcophagus in its own hidden coffin (search DC 28)
that is beneath the hollow floor of the false sarcophagus. Buried in
the hidden resting place of King Yearon is his magical sword and shield
which he used in life, as well as some other magical tokens. Likewise,
the coffin is made of stone, plated in gold, and bejeweled (3000gp value
should the adventurers invent some way to transport its great mass).
The properties of King Yearon's magical sword and other items are left
to the imagination of the Dungeon Master.
Scattered about the sarcophagus are the
following items of value: animated shield +1, heavy mace of
shock, potion of wisdom, potion of cat's grace, potion
of heroism, oil of timelessness, ring of warmth, scroll of
water breathing, scroll of healing circle, dust of illusion,
masterworked full plate, masterworked greatsword, masterworked chain shirt,
mighty (+2) composite shortbow (225 gp value), 8 bloodstones (50 gp value each),
3 tourmaline stones (100 gp value each), an ivory ewer (55 gp value), worn large
wool tapestry (35 gp value), 4 flasks of alchemists fire (20 gp value each),
7000 gp, 6000 sp, and 7500 cp.
Any characters who survive to leave the tomb
and later return to continue their plunder become affected by a potent
curse. The curse will cause the characters to be visited and attacked by
a terrible horde of undead, once each year, on the anniversary of their
raiding of the tomb. This curse lasts until either removed (by a remove
curse cast by a 15th level spell-caster or higher) or until the
characters death (it doesn't continue to haunt raised characters).
T5. The Hidden Vault
Descending down the stairs hidden in the join chests of area T3, the
adventurers will enter into area T5. This chamber has roaring flames
burning and encircling the outer perimeter of the room. Coming within 5 ft.
of the causes 2d6 points of damage per round. Immersion of an object into
the flames deals 20d6 points of damage per round. The heat of the flames does
not extend more than 5 feet beyond the flames themselves though and one can
come quite close to them without being burned.
| As you climb down the stairs into the
chamber below you can see this room is quite different from the other rooms
you have been in. The room is large and round. Terrible flames lick up the
walls of the room swirl about, but strangely you feel little heat from them
until you approach closer - then their mighty heat buffets your face.
Most of the center of the room is taken up by a great cylinder of twisting
water which courses down from the ceiling and rapidly moves in the direction
opposite the flames. The wall of water is dark, deep, and almost completely
opaque. Only a faint shadow of something blocky and man sized can be seen
through the quickly moving waters. The room is traversable and one can walk
around it, between the outer wall of fire and the inner wall of water.
|
The center of the room is blockaded by a great wall
of swirling water which forcefully falls like a watery twister from ceiling to
floor. Anything dipped into the swirling waters must make a size modified strength
check (DC 20) or be sucked into the water and never seen again. Adventurers would
be unwise to stick their arms into the water to see if they can feel through to
the other side.
The water and fires move in counter direction to each
other around the room; the water moving clockwise and the fire moving counterclockwise.
Both obviously are moving quickly The Dungeon Master should not simply blurt that
they are dangerous, but imply it through a threatening sounding description and let
the players draw their own conclusions.
Before what is in the middle of the room can be revealed
the adventurers must drop some water (any water) into the fires of the room and must
place some fire (again, any fire will do) into the waters in the middle of the room.
Once both of these things have happened, roll some random dice, you should shake your
head in disappointment for the players to see, tell the players to roll fortitude saves,
read the following text, and savor the expressions on their faces:
Your attention is drawn to the fire that encircles the room as the wall of flame wavers
and then roars aloud. Tenfold stronger and brighter, the fire swirls ever faster and
begins to fill the room with tongues of reaching flame. Alarmed you turn about and
see that the maelstorm of water has also begun to expand out from the center of the
room. Seeing that the two will soon collide, simultaneously incinerating and drowning
everything in the room, you look for the stairway exit, but it has already been
consumed in fire.
The two collide, swallowing you up and tossing you about
the chamber. For a moment there is searing heat and a powerful rending water current
smashing against you at once. Then, in mere moments, a powerful vortex opens up in
the center of the chaos and everything is sucked into it to never be seen again....
except for you.
Wet with warm water and slightly singed, you lay on the
floor of the chamber. The wall of fire and the wall of water are no more. Now, in the
center of the room, you can see a wide pit encircling an island of stone, floating
in the center of the pit, a ten foot jump from its outer edge.
Upon the floating platform of stone rests a short marble
pedestal from which a flat white light emanates. As you look closer it appears there
is some strange stone laying atop the pedestal from which the light is radiating.
|
Award 600xp to each character that participated in solving the
fire and water puzzle.
This strange stone is actually part of the Book of Three.
It is stone because it has not been joined with the other two remaining parts of
the relic. The properties of the relic are left up to the Dungeon Master, but it
should be of artifact power and somehow fit into the story above should the legend
at the beginning of this module be used as a background for the temple. Removing
the book fragment from the pedestal will remove the aura from the tomb which
prevents evil creatures from approaching it and the light between the two small
pedestals atop of the temple is extinguished. However, the book fragment itself
continues to glow with a steady, soft, white light.
Concluding the Adventure
Once the tomb has been opened and fully exploited the adventure is over. If the
item hidden in area T5 was not taken by the players than the spirits of the
tomb eventually recoalesce and put the place back in order. This takes a month to
accomplish, allowing the adventurers ample time to return and retrieve any plunder
they had to leave behind. Remember that should the players leave the tomb and
return later on to continue plundering it that they will suffer the effects of
the curse detailed in area T4.
The tomb will eventually become a den for the inhabitants
of the swamps, the magic which kept them at bay now destroyed.
Treasure in the tomb amounts to approximately
27,000gp worth of treasure. This is a standard value of treasure for the
challenges that the tomb poses.
If you use the optional storyline experience awards
and the players retrieved the item hidden in area T5 then each player
should receive 50xp per character level for completing the module.
|

